

Creating a page and adding content is quite straightforward. Visuals are an essential part of any website message and design so make sure to add images and video.
Adding pages to your website is done in two steps. First you create the page and add your content. Second you link to the page from the menu.
Create a page
Pages can be found in the left side menu. Open Pages and click on the blue button in the upper right corner. Give the page a name and click Create.
Note! Every page needs to have a unique name.

Add content to your page (tab 1 - Page)
Content to a page is added in two separate tabs. In the first tab you add text and embed images. In the second tab, related media is added.
Page headline
Page header (h1) is entered into the header field. Header will appear centered and in upper case letters under the hero image (top image, if added). Without hero image, page header will end up at top of the page.
Image header
Text to hero image (top image) is added as an overlay and is optional. Font style is predefined and can't be edited. The image itself is added in the next tab.
 ____________________________________________________________________
Body text
There are two main ways to customize how text looks:
- Formatting the structure of the text, including alignment and bold/italics/underlined.
- Styling the look of the text, including font colors and sizes.
If you copy and paste the text from Word (or any other word processing program) or an HTML page, you might want to clear formatting first. Mark the text and click the clear formatting icon in the text editor.
![]()
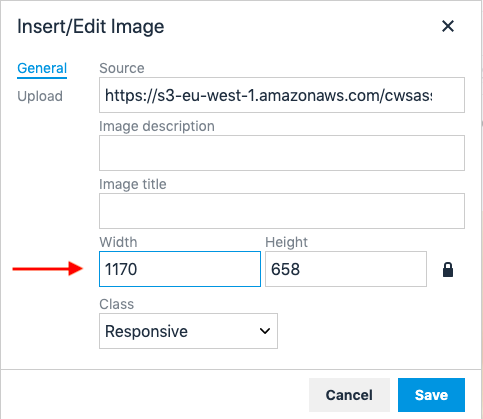
Embed images
Add images to break up the text and make your page an engaging experience. To upload an image, click the image icon in the text editor bar.
![]()
The dimensions of the original image you upload can have a big impact on how it displays. We recommend using images that are at least 1200 pixels wide.
Promote a page in the carousel on the start page. Check the box for 'Carousel' under Display.
This offers the possibility to add any of the contacts listed under 'Contact cards'. Check the name/s of the contacts you want to display to the page. Contacts end up listed at the bottom of the page.
Add hero image and other media (tab 2 - Related media)
Upload your hero image and other media to the page, such as logos, videos and fact sheets. All added files (expect hero image) will end up at the bottom of the page, under separate (pre-defined) headers such as Images, Files, Video.
Manage images
Once uploaded in admin, images can be cropped to set the correct aspect ratio. You can also rename files. Edit the image by clicking the settings wheel at the top right.

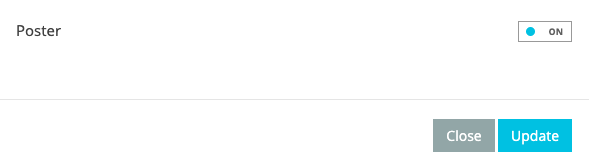
Set hero image (top image)
Select the image you want to use as top image, turn the switch to 'On', and Update.
Publish page (tab 3 - Publish)
Publish your new page by clicking the Publish button. The page is now published but still needs to be linked to a menu item in order for anyone to find it. But first you might want to preview the page.
Preview page
Open your website and visit any page. Replace the page name in the URL (displayed after last slash) by entering the new page name. Note that if your page name contains more than one word you add a hyphen between the words.
Example;
www.xxx.com/page/PAGE-NAME
Add link to menu
All menu links are managed under 'Menus', regardless if the page is added as a main or sub category menu item.
Note! You first need to create a main menu item in to be able to add a sub menu item.
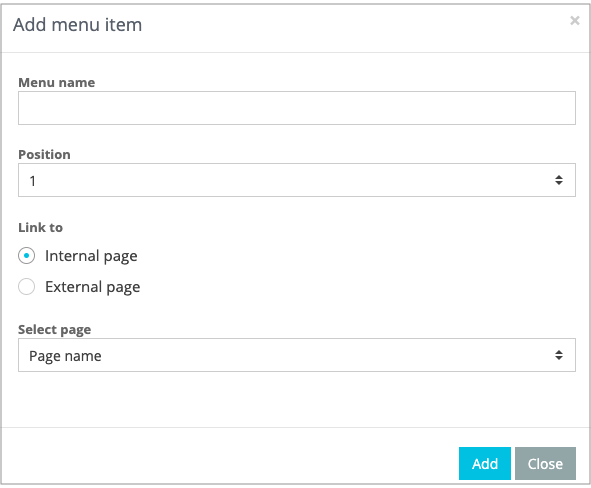
Add menu item
Click the blue button to the top right to create a new menu item.
Add menu text
Enter the name of the menu item and set the order of position. The lower the number the further to the left in the menu it will appear.
Note! If two menu items are given the same position they are sorted alphabetically.
Link to page
Choose 'Link to' an Internal page and select the page you have created from the drop down. Click Add.
Add submenu item
Submenu items are created the same way as main ones but are added to the already listed main item. Click the settings wheel to add submenu item (or update the main item).

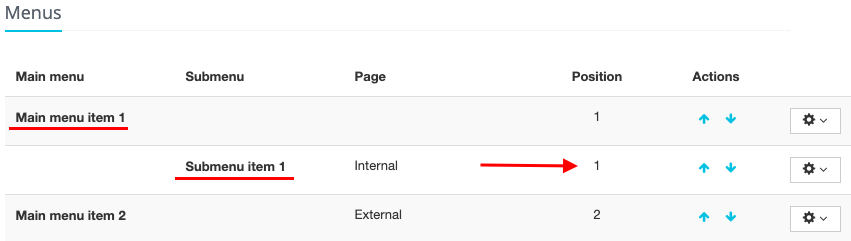
Menu list overview
Under Menu you can overview the structure of your menu/s and can manage the same easily, changing order, updating names etc.
Note! Main and submenus are listed in separate columns whilst position is listed in the same column.
Comments
0 comments
Please sign in to leave a comment.