
Whether automatically imported or manually created, Schedules can easily be edited.
A short introduction
TV schedules consists of three parts:
Event - the actual date and time the broadcast is taking place, example: Friday, August 22nd 2018, 06:00-07:00.
Content - information within an event, e. g. title of program, program description, cast, EPG images etc.
Material - technical and rights information about an Event.
In the Schedules module you manage Events, connect Events to Content and manage Material related to Events.
While Content is managed and edited in the Mediabox module, connections between the two modules allows for updating some parts of Content to an Event, in Schedules.
Choose a day to edit
When entering schedules the calendar shows the current day/week by default. Choose month, week and day you would like to edit by clicking a date in the calendar. The full schedule of that day will display below the calendar. Editing can be done to both a published and unpublished event.
To enable editing, click the blue button to the right.

Edit an event
You can choose to edit an event by accessing Quick Editing Mode, or by choosing Full Editing Mode.
Quick editing mode:
For quick editing mode, expand the event by clicking the program title (editing is only possible after first clicking Enable edit mode button, see above).

1. Event information is found to the right. You can edit information such as event start and end times, event status and regional block by clicking the edit button to the right of 'Information'.
2. Content information (title) is found to the left. You change program or episode via the settings icon drop down menu, right of the program title and by browsing Mediabox for available content.
If you want to edit the actual Program in Mediabox, click the icon on the right of the title to open the program in a new window.
3. Material. Can only be edited in Full Edit Mode, see below.
Full Edit Mode:
Click on the edit icon to the right of the title (this is only visible after clicking Enable edit mode button, see above).

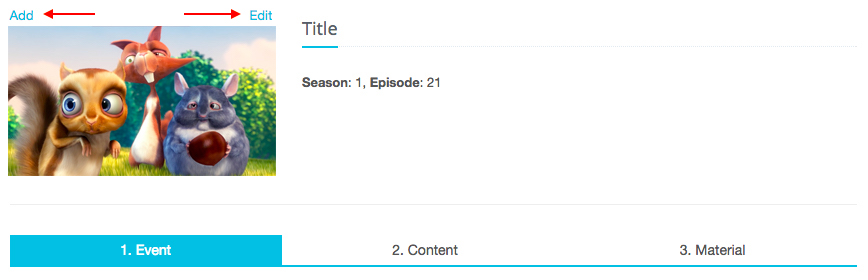
1. Event tab
Event tab allows you to set start and end time and event status to an event (i. e. Premiere, Rerun, Live, Leadtext).
2. Content tab
Content to an event can either be updated by creating a new program or by attaching content from Mediabox.
 - If a program is not available in Mediabox you can create a new program. Choose what category the program should belong to and add title, original title and description. New programs created in Schedules will automatically be saved to Mediabox.
 - If a program already exists in Mediabox you can easily attach that program from the Mediabox module. Choose category, find the program by title and if available, by season and episode.
3. Material tab
Material tab contains technical information and rights to an Event (note that Material is linked to an Event, not the Content). You can update and add material to an Event such as video and audio format as well as certain rights.
Add or update poster image to a program
Content to an event also include a poster image. As explained earlier, all Content is available and editable in Mediabox, but you can work with poster in Schedules.
At the top you will see Poster image or image icon (if image is missing). Click 'Add' to upload an image. You can also update an existing image information (such as Title, Description and Copyright) by clicking 'Edit'.
Send image via EPG API
In 'Edit' you can choose to distribute images as EPG by switching 'Send via EPG API' to ON.
Edit description to a program in PressWeb
If you want to present a program differently in PressWeb you can edit description specifically for PressWeb Schedules. There is no need to enable Edit mode.
Simply find date and program and click on the program title in the list. To create a new description for PressWeb, click the plus icon.

Add description and click Create. This description will be available to the program in PressWeb Program presentation in front end only. The original content description will remain in Schedules download format and Schedules API.
Comments
0 comments
Please sign in to leave a comment.